8 Easy Paper Star Tutorials you Won’t Want to Miss!

In this post: Learn 8 fun and easy paper star tutorials to do with kids! Post contains affiliate links. 

Looking for a fun and creative activity to enjoy with your kids? Look no further than homemade paper stars! From big paper bag stars to delicate origami creations, there’s something for everyone to enjoy on this post. Not only are these crafts fun, but they also provide an opportunity for children to develop their fine motor skills and unleash their creativity. Plus, you can easily incorporate Spanish into the activity by introducing vocabulary related to shapes, colors, and crafting techniques. Encourage your kids to use Spanish words as they follow along with the tutorials, turning this craft session into a fun and immersive language lesson. In this blog post, I’ll share 8 different paper star tutorials that are perfect for crafting with kids.

Table of Contents

Materials for Making Paper Stars at Home

Before diving into these paper star tutorials, look over the following materials that can help you get started:

1. Paper bags or colored paper
2. Scissors
3. Glue or tape
4. Kite paper 
5. Origami paper or colored paper squares 
6. Paper straws
7. Craft beads, sequins, or other embellishments 
8. Paper plates
9. Markers, paint sticks, and other coloring materials.
10. Old magazines
11. Any additional decorative materials desired, such as glitter, stickers, or ribbon.
12. Paper Coffee Filters

With these materials in hand, you’re ready to embark on a fun-filled crafting adventure with your kids while incorporating Spanish language learning along the way. Let’s get started!

Shop this Post

3 Waldorf Window Star Tutorials to Try

I absolutely love making Waldorf window stars, both on my own and with my kids! It is such a fun craft to learn and there are so many different tutorials you can find. Waldorf window stars make fantastic decorations for glass windows and doors. There is something so special about the way light shines through the colorful kite paper. Here are some of my favorite Waldorf window paper stars tutorials that are free and easy to follow!

A Basic 8-pointed Waldorf Window Star Tutorial

To start, gather your kite paper. I typically use sheets that are around 6.5 inches and cut them into quarters. Use any mix of colors that you would like!

Take your first square of kite paper and fold it in half. Then, unfold it and fold it in half the other way. Open up the paper completely, and fold one corner towards the center. Repeat this step with the remaining corners until all corners are folded into the center.

Next, fold two opposite sides towards the center line to create a star point. Repeat this process for the remaining seven pieces of paper. You will need 8 folded pieces in total.

Now, it’s time to assemble the star. Once you have all eight points completed, start by applying a small amount of glue and attaching the first point to the second point. Make sure the side with the folds is facing the back. Continue attaching each point until your star is complete.

Finally, use a small dab of glue to attach your completed star to a window for a beautiful decorative touch!

Make a Pinwheel Paper Waldorf Star

Start with a square piece of kite paper that measures 6 inches by 6 inches. Cut it into four equal parts. If you’re making rainbow stars, you’ll need 8 different sheets, each cut into fourths. This will give you enough paper to make 4 stars. Alternatively, you can make beautiful single color pinwheel paper stars! In that case, you’ll only need 2 sheets of kite paper, each cut into fourths.

Start by aligning each square on a flat surface to form a diamond shape.

Next, fold each square in half down the middle, then unfold them.

Now, take the two corners on one side and fold them towards the middle, securing them with glue.

After that, fold the top-left corner tip to the center line, and repeat the same with the top-right corner. Glue them in place securely.

Then, fold the bottom-right tip to the center line and glue it down.

Repeat these folding steps for all 8 pieces.

Now, let’s assemble your paper pinwheel stars!

Begin by taking the unfolded side of the top color and glue it over the folded side of next folded color you want to use, ensuring they align along the center line. Keep going, making sure to align each piece.

Slide the last piece in between until it fits, and then glue it in two spots: first to the piece beneath it, then to the next piece, completing the star.

Finally, you can hang up each star individually or string them together for a pretty window display!

How to Make a Waldorf Snowflake Star

Waldorf paper snowflakes are such a special way to celebrate the wintery season and decorate your home! It’s a twist on the classic Waldorf star and still an easy tutorial to make with kids. 

To make a paper Waldorf snowflake, gather two sheets of standard kite paper, glue, and scissors. Use any colors you’d like, just because snowflakes are white doesn’t mean you can’t make them colorful just like in the tutorial above!

Fold each sheet in half twice to create four sections, then cut them out. This will give you eight small squares.

Take one square and fold it diagonally, then fold the side corners to meet the center guide line, followed by the opposite corners. Repeat this process for all eight squares.

Finally, glue the folded squares together to form your snowflake. Hang on your windows with glue or clear tape. 

Check out these other fun Kite Paper crafts!

Make Paper Bag Stars

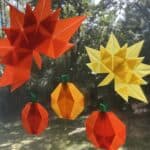
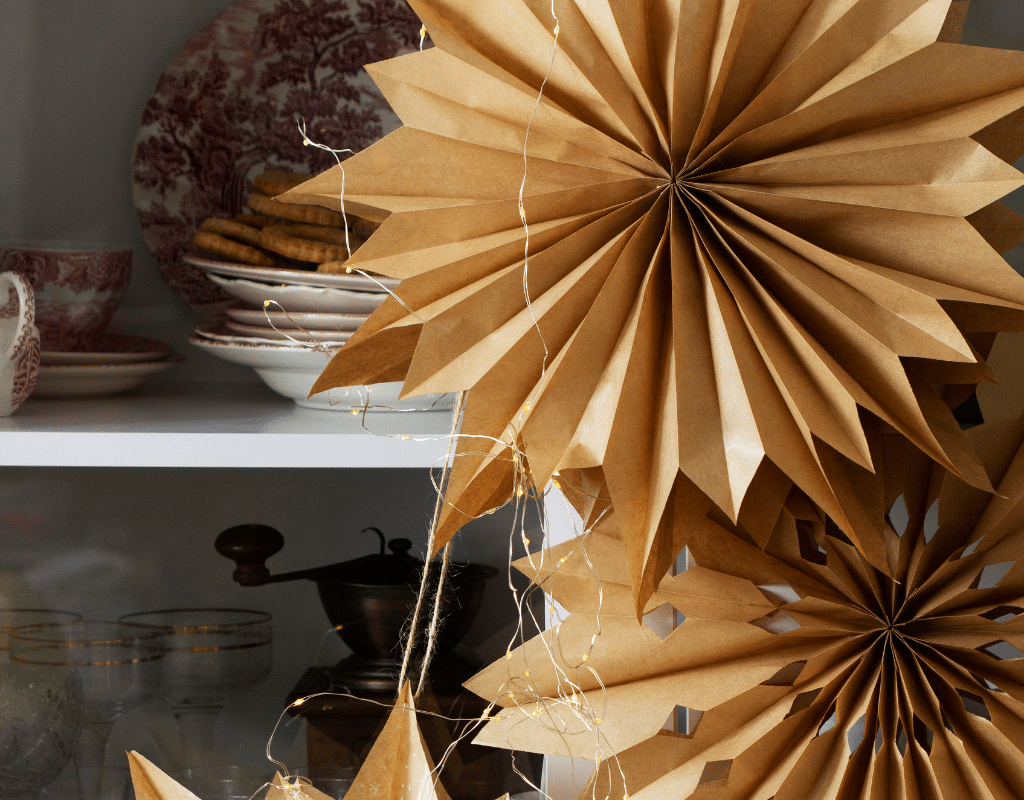
These paper bag stars are a staple in my home during the holiday season! You can hang them as stars or snowflakes, or both. All you need are paper bags of any size, glue, and string to hang them. You can use standard glue sticks or a hot glue gun. 

First, determine the number of paper bags you’ll need. For standard size lunch bags, aim for 7-9 bags, with 8 or 9 for a fuller appearance. If using smaller bags, you can experiment and try anywhere from for 12-14 bags.

Apply glue to the back of each bag, covering the bottom and up the center to form a T shape of glue.

Next, stack another bag on top, making sure that it faces the same direction, and press firmly. Continue adding glue and bags in this manner, forming a T shape and stacking the bags on top, all facing the same way.

Once your bags are glued together, you can add some decorative designs to your paper bag stars! Cut small triangles or other shapes into the sides of the bags. For easier cutting, especially with a large number of bags, create two stacks of glued bags, cut them as desired, then glue the cut stacks together.

Don’t forget to trim the tops! You can cut the stack to form a point or any desired shape.

Once your cutting is all done and all your bags are aligned, apply more glue to one side, open the bags, press the sides together, and hold for a minute to let the glue dry.

Punch a hole in the bag, thread a string through, and tie it off. Now, you can hang your paper bag stars and enjoy!

You can also follow a similar process to create cute paper bag flowers! 

Simple Coffee Filter Paper Stars

Transform ordinary coffee filters into beautiful paper star decorations! This is a super simple craft and is great for kids learning how to accordion fold. 

To make a coffee filter star, start by gathering 6 coffee filters. 

Working one at a time, you will want to do an accordion fold. Start by folding the bottom seam of your filter back about 1/3″ – then keeping the same width, work back and forth until you reach the top. 

Next, pinch the center of your folder filter and fold it in half.

Apply hot glue to the inside center of your folded star and hold it together until it’s dry.

Repeat these steps 5 more times, creating six sections of your Coffee Filter Paper Star.

Lay each section on a flat surface, arrange them with the folded middles meeting together and glue the sides together.

Once all sections are hot glued together, you’ll have yourself a beautiful Coffee Filter Paper Star!

Tiny 3D Origami Paper Stars

My children are absolutely obsessed with these 3D little paper stars. They call them their “lucky stars” and use them in their imaginative play all the time. You can also thread them to make lovely paper star garlands!

Start by gathering strips of paper to make these 3D paper stars. Use strips of paper of any size, I usually cut 1″ wide strips out of regular printer paper or construction paper measuring about 11″ long paper. 

First off, start by making a loop at one end of the paper strip,  This will the start of our ‘knot’. 

Complete the knot by tucking one side of the strip through the loop, then press it flat to secure it. This will form a pentagon shape and create a knot. 

Fold the shorter end back behind the paper knot your just made, adjusting and/or trimming it as needed to fit neatly. Then, begin wrapping the longer end all around the knot, following the pentagon’s contours.

Continue folding the paper strip around the pentagon shape. When you reach the end of your strip of paper, tuck the end inside and trim if necessary.

Finally you’ll need to shape your star to get it 3D! Gently squeeze the edges of the pentagon to form the star’s points. Press the center of each side inward to define the points of the star. You might need to shape and adjust a few times until you’re happy with the result. It might take a couple of tries to get that perfect star shape, but keep at it!

Check out my Spanish podcast for kids!

Easy Paper Plate Stars

These paper plate stars couldn’t get any easier! It’s a great process art project that brings out a lot of creativity in kids (and in yourself!)

Set up a crafting station with paint, paint sticks, crayons, markers, glitter glue, sequins, or anything else you want to decorate your paper stars. 

Let your children decorate paper plates any way they want. I love using paint sticks (we really love these pastel paint sticks) because they are a great low-mess way to create fun colors and shapes. Decorate as many paper plates as you’d like and then set them aside to dry. 

Next simply cut out large star shapes! You can hole punch each one and hang them to create a beautiful mobile or hanging paper star display. 

Paper Straw Star Tutorial

Last but not least on my list of paper star tutorials, paper straw stars! These aren’t your typical paper stars, but they are so much fun to make and decorate with! They’re another craft that’s perfect for the holidays. I always use them to decorate presents with instead of bows. You can also hang them on your Christmas tree or from windows for a cute display.

To make them grab some cute paper straws, the more colorful the better. 

Gather 5 paper straws cut in half (that’s enough to make two stars) in any color combination that you’d like, scissors and your string. 

Next, grab 5 equal length sections of paper straw and thread them onto one long length of string. Tie your two ends of string tightly together so that your straws form a pentagon shape, and they’re all nice and snug. Trim the ends of your string or leave it long for hanging later on!

Now, let’s get to the folding part. Twist the shape as you fold it in half, so you end up with two triangles. Then, fold each triangle toward each other, and tuck the top point of the bottom triangle underneath the straight bottom edge of the triangle above it. You might need to adjust the straws a bit to get them into the right spots for a symmetrical star, but if you’ve folded it correctly, it should fit snugly and stay in place.

Now hang wherever you’d like and enjoy! 

Spanish Words to Teach your Kids while you Craft

As a Spanish teacher, I always look for any way to get my children speaking en español while we work on fun projects! Here’s a list of handy Spanish words and phrases for crafting with kids. 

Materiales (mah-te-ree-AH-les) – Materials
Papel de colores (pah-PEL de koh-LO-res) – Colored paper
Tijeras  (tee-HE-rahs) – scissors
Pegamento de barra (peh-gah-MEN-toh deh BAH-rrah) – Glue stick
Papel de construcción (pah-PEL de kon-strook-SYOHN) – Construction paper
Triángulo de papel (tree-AHN-goo-loh deh pah-PEL) – Paper triangle
Pliegue (PLEYH-geh) – Fold
Doblado (doh-BLAH-doh) – Folded
Forma (FOHR-mah) – Shape
Estrella de papel (ehs-TREH-yah deh pah-PEL) – Paper star
Crear (kreh-AHR) – Create
Cortar (kohr-TAHR) – Cut
Pegar (peh-GAHR) – Glue
Brillante (bree-YAHN-teh) – Shiny
Colorido (koh-loh-REE-doh) – Colorful
Divertido (dee-vehr-TEE-doh) – Fun
Fácil (FAH-seel) – Easy
Paso a paso (PAH-soh ah PAH-soh) – Step by step
Vamos a empezar (VAH-mohs ah ehm-peh-SAHR) – Let’s begin
Sigue así (SEE-geh ah-SEE) – Keep going
¡Lo estás haciendo genial! (loh ehs-TAHS ah-SYEHN-doh heh-NYAL) – You’re doing great!
¡Muy bien hecho! (MWEY byen EH-choh) – Well done!
¡Qué bonito! (keh boh-NEE-toh) – How beautiful!
¡No te preocupes, sigue intentándolo! (noh teh preh-oh-KOO-pehs, SEE-geh een-tehn-TAHN-doh-loh) – Don’t worry, keep trying!
¡Disfruta del proceso! (dees-FROO-tah del proh-SEH-soh) – Enjoy the process!

Want to learn even more Spanish at home with your kids?

Check out my Spanish courses and curriculum for families and kids of all ages!

In conclusion, I hope you enjoyed this blog post with all these paper star tutorials! Crafting paper stars can be a really fun activity for both children and adults alike. By following these free step-by-step paper star tutorials provided in this blog post, you can easily make a variety of paper stars to decorate your home, celebrate holidays, or give as thoughtful gifts to loved ones.

So gather your materials, dive into the world of paper crafting, and enjoy the journey of bringing these beautiful stars to life (while hopefully also learning some Spanish too!)

¡Vamos a crear estrellas de papel juntos y disfrutar del proceso! (Let’s create paper stars together and enjoy the process!)

Like this post? Share & Save it!

Leave a Comment

one × 4 =